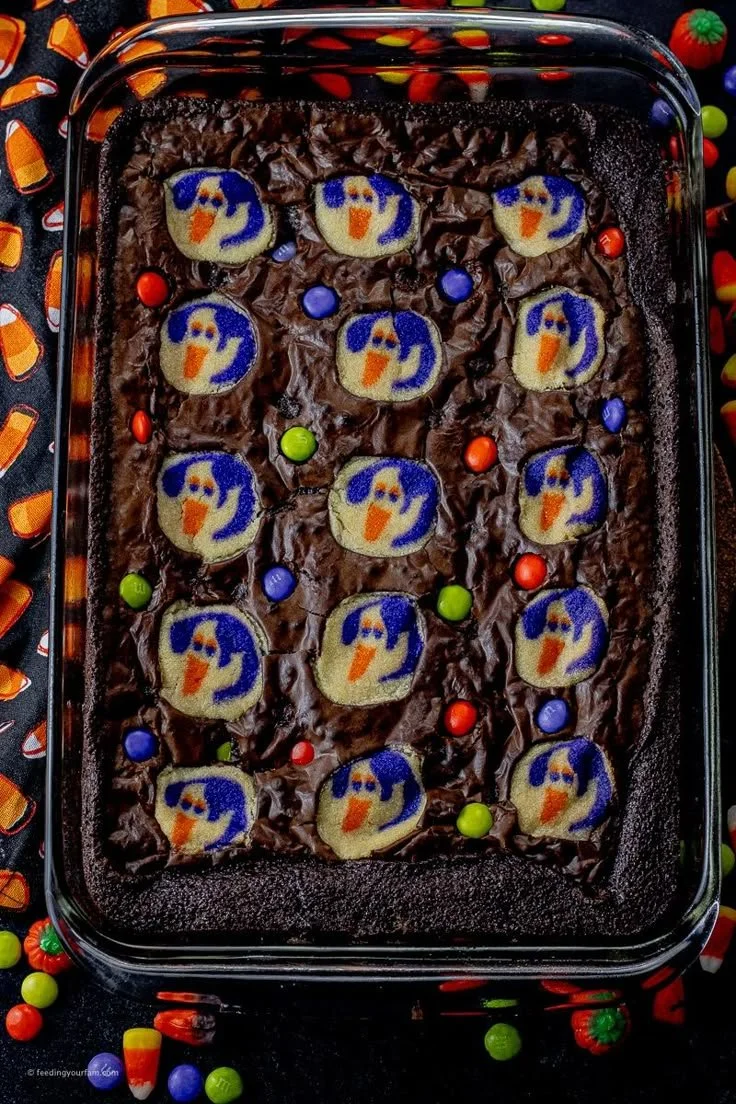
Indulge in the delightful experience of making Spooky Halloween Brookies! These delicious treats combine rich brownies with soft, chewy cookies, topped off with sprinkles for that extra festive touch. Whether you’re entertaining guests or simply want a family-friendly dessert, this recipe is sure to bring smiles all around.
Why You’ll Love Spooky Halloween Brookies
-
Perfect for Halloween: These brookies feature playful elements that make them ideal for Halloween gatherings, parties, or school events.
-
Two Treats in One: Combining brownies and cookies satisfies everyone’s sweet tooth, making it a versatile dessert option.
-
Easy to Make: With simple ingredients and straightforward steps, even beginner bakers can whip these up without stress.
-
Customizable Fun: You can personalize them with various toppings or mix-ins, allowing for creativity in your baking.
-
Makes a Great Treat for Sharing: Perfect for parties, these brookies can be cut into fun shapes and shared with friends and neighbors.
Recipe Overview
- Prep Time: 20 minutes
- Cook Time: 25 minutes
- Total Time: 45 minutes
- Servings: 24
- Difficulty Level: Easy
Ingredients You’ll Need for Spooky Halloween Brookies
-
For the Brownie Layer:
- 1 cup unsalted butter
- 2 cups granulated sugar
- 4 large eggs
- 1 teaspoon vanilla extract
- 1 cup all-purpose flour
- 1 cup cocoa powder
- 1 teaspoon baking powder
- 1/2 teaspoon salt
-
For the Cookie Layer:
- 1 cup unsalted butter, softened
- 3/4 cup granulated sugar
- 3/4 cup brown sugar, packed
- 2 large eggs
- 1 teaspoon vanilla extract
- 2 1/4 cups all-purpose flour
- 1 teaspoon baking soda
- 1/2 teaspoon salt
- 1 cup chocolate chips
- 1 cup Halloween-themed sprinkles

How to Make Spooky Halloween Brookies
-
Preheat the Oven: Preheat your oven to 350°F (175°C) and prepare a large baking pan (about 12×17 inches) by greasing it or lining it with parchment paper.
-
Make the Brownie Batter: In a saucepan over medium heat, melt the 1 cup of unsalted butter. Once melted, remove from heat and stir in the granulated sugar until smooth. Add eggs, one at a time, stirring well after each addition. Mix in the vanilla extract. In a separate bowl, combine flour, cocoa powder, baking powder, and salt. Gradually add this dry mixture to the butter and sugar mixture, stirring until fully combined.
-
Layer the Brownies: Pour the brownie batter evenly into the prepared baking pan, spreading it out to cover the bottom.
-
Prepare the Cookie Batter: In a large mixing bowl, cream together the softened butter, granulated sugar, and brown sugar until fluffy. Add the eggs, one at a time, and mix in the vanilla extract. In another bowl, whisk together the flour, baking soda, and salt. Gradually mix the dry ingredients into the wet ingredients until just combined. Fold in the chocolate chips and sprinkles.
-
Layer the Cookies: Gently dollop spoonfuls of the cookie dough over the brownie layer in the baking pan. Use a spatula or the back of a spoon to spread the cookie batter evenly over the brownies.
-
Bake: Place the pan in the preheated oven and bake for 25-30 minutes or until the edges are set and a toothpick inserted into the center comes out with a few moist crumbs.
-
Cool and Serve: Once baked, remove the brookies from the oven and allow them to cool in the pan for about 15 minutes. Transfer them to a cooling rack to cool completely before slicing into squares or fun Halloween shapes.
Tips for Success
-
Do Not Overmix: Overmixing the cookie batter can lead to tough cookies. Mix until just combined.
-
Check for Doneness: Since ovens vary, check your brookies at the 25-minute mark to avoid overbaking.
-
Allow to Cool: To achieve neat slices, let the brookies cool completely before cutting.
-
Experiment with Add-Ins: Feel free to add nuts or other candies for added flavor and texture.
-
Use a Food Scale: For precision in baking, use a kitchen scale for measuring your dry ingredients.
Easy Variations
-
Nutty Filings: Add chopped nuts like walnuts or pecans to the cookie batter for crunch.
-
White Chocolate Chips: Swap regular chocolate chips with white chocolate for a different flavor profile.
-
Dried Fruit: Mix in dried cranberries or cherries for a chewy contrast to the rich chocolate.
-
Swirl in Frosting: After baking, spread a layer of cream cheese frosting on top for a festive touch.
-
Adjust the Sprinkles: Use themed sprinkles for different occasions or holidays beyond Halloween.
What to Serve with Spooky Halloween Brookies
-
Vanilla Ice Cream: A scoop of vanilla ice cream pairs beautifully with the rich chocolate flavors of the brookies.
-
Hot Chocolate: Serve with a warm cup of hot chocolate for a cozy treat during chilly fall evenings.
-
Milk: A classic glass of milk is always a delightful accompaniment to sweet treats like these.
-
Fruit Salad: Balancing sweetness with fresh fruit can make for a refreshing side.
-
Halloween-themed Snacks: Complement your dessert table with other spooky snacks like ghost-shaped cheese or jack-o’-lantern veggies.
Storage and Reheating
-
Refrigerator Storage: Store leftover brookies in an airtight container in the refrigerator for up to 5 days.
-
Freezer Storage: To freeze, wrap them tightly in plastic wrap and place them in a freezer-safe container. They can last for up to 3 months.
-
Best Reheating Method: Reheat individual brookies in the microwave for about 10-15 seconds until warm, or pop them in the oven wrapped in foil at 350°F for a few minutes.
-
Preserve Texture: To maintain their texture, avoid stacking them tightly when storing.
-
Meal Prep Note: These brookies can be made ahead of time, making them a perfect candidate for Halloween meal prep.
Common Mistakes to Avoid
-
Underbaking the Brownie Layer: Ensure the brownie layer is fully baked before adding the cookie layer to avoid sogginess.
-
Using Warm Butter: Make sure your butter is at room temperature for the cookie layer to achieve the right texture.
-
Ignoring the Parchment Paper: Lining the pan helps in easy removal and prevents sticking, so don’t skip this step.
-
Overloading with Mix-ins: Use a reasonable amount of additional ingredients like chocolate chips or nuts to avoid affecting the baking consistency.
-
Not Allowing to Cool: Cutting the brookies before they cool can result in messy pieces. Patience pays off!
Spooky Halloween Brookies: Background & Cultural Inspiration
Brookies are a fantastic mix of two beloved treats, embodying the comfort of brownies with the versatility of cookies. This combination can be traced back to modern baking trends, where flavors and forms blend seamlessly to create unique desserts that cater to diverse taste preferences. Halloween, known for its fun and frightful celebrations, inspires these brookies, inviting bakers to use their creativity with festive colors and shapes. The joyous spirit of sharing treats during this spooky season makes Spooky Halloween Brookies a fitting centerpiece for any gathering.
Frequently Asked Questions
Can I make these brookies ahead of time?
Absolutely! You can bake them a day in advance. Just store them in an airtight container once they’ve cooled completely to keep them fresh for your event.
Can I substitute the butter?
You can use margarine or a plant-based butter alternative if you need to avoid dairy.
How can I make these brookies more festive?
Consider using colored frosting, Halloween-themed decorations, or food-safe markers to add more festive touches!
What if I don’t have all-purpose flour?
You can substitute it with a gluten-free flour blend or whole wheat flour, but keep in mind it may change the texture slightly.
How do I know when they’re done baking?
Look for firm edges and a soft center. A toothpick inserted should come out with a few moist crumbs, indicating they’re perfectly baked.
Final Thoughts
Spooky Halloween Brookies are a delightful way to celebrate the season with family and friends. With their sweet cookie and brownie layers, these treats offer a fun twist on classic desserts. Easy to prepare and perfect for sharing, you’ll find that everyone in your home will love them. This Halloween, let these brookies be a part of your festive traditions—happy baking!
PrintSpooky Halloween Brookies
Delightful treats combining rich brownies and soft cookies, perfect for Halloween celebrations.
- Prep Time: 20 minutes
- Cook Time: 25 minutes
- Total Time: 45 minutes
- Yield: 24 servings
- Category: Dessert
- Method: Baking
- Cuisine: American
- Diet: Vegetarian
Ingredients
- 1 cup unsalted butter (for brownie layer)
- 2 cups granulated sugar
- 4 large eggs
- 1 teaspoon vanilla extract
- 1 cup all-purpose flour
- 1 cup cocoa powder
- 1 teaspoon baking powder
- 1/2 teaspoon salt
- 1 cup unsalted butter, softened (for cookie layer)
- 3/4 cup granulated sugar
- 3/4 cup brown sugar, packed
- 2 large eggs
- 1 teaspoon vanilla extract
- 2 1/4 cups all-purpose flour
- 1 teaspoon baking soda
- 1/2 teaspoon salt
- 1 cup chocolate chips
- 1 cup Halloween-themed sprinkles
Instructions
- Preheat the oven to 350°F (175°C) and prepare a large baking pan by greasing it or lining it with parchment paper.
- Make the brownie batter by melting the unsalted butter in a saucepan, stirring in granulated sugar, adding eggs and vanilla extract, and combining with dry ingredients.
- Layer the brownie batter evenly in the prepared baking pan.
- Prepare the cookie batter by creaming together softened butter and sugars, adding eggs and vanilla, then mixing in dry ingredients with chocolate chips and sprinkles.
- Layer the cookie dough over the brownie layer in the baking pan.
- Bake for 25-30 minutes or until edges are set and a toothpick comes out with a few moist crumbs.
- Cool for about 15 minutes in the pan, then transfer to a cooling rack to cool completely before slicing.
Notes
Do not overmix the cookie batter and be sure to check for doneness as ovens vary.